
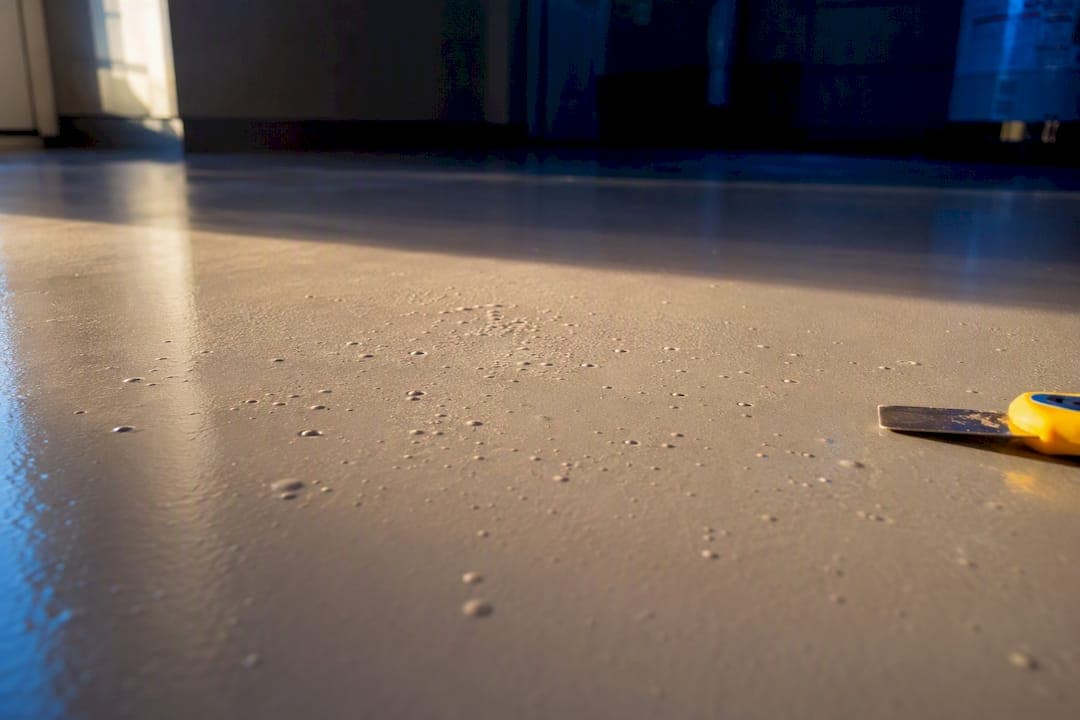
Most epoxy floor bubbles come from air or moisture escaping the concrete slab or from air whipped into the mix during application, and neither is usually a sign of a ruined floor. If bubbling covers only a few spots, you can often pop and smooth them while the coating is still workable. If bubbling spreads across large sections, stop and test the slab for moisture before you coat over anything.
TL;DR:
- Moisture testing with an ASTM F2170 RH probe is essential to prevent bubbling caused by trapped water vapor beneath the slab.
- Proper surface profiling through diamond grinding creates a mechanical bond surface and reduces pore space, lowering the risk of bubbles.
- Mixing epoxy at 100 to 300 rpm with a resting period of two to five minutes before pouring minimizes air entrapment during application.
- Bubbles appearing after curing often require grinding, cleaning, and patching, unlike fresh bubbles that can be popped with a roller or heat gun.
- Large-area bubbling or recurring issues indicate slab-wide moisture or vapor problems, making professional testing and possibly moisture mitigation necessary before re-coating.
Table of Contents
- What Causes Bubbles in Epoxy Floor Coatings?
- How Do You Fix Epoxy Floor Bubbles Right Now?
- How Do You Prevent Bubbles Before You Coat?
- When Should You Call a Professional?
- A Contractor's View on Bubbling and Prep
- What This Guide Gets Right That Others Miss
- Sources
What Causes Bubbles in Epoxy Floor Coatings?
The single biggest culprit is outgassing: air trapped inside porous concrete pushes upward as the slab warms or as barometric pressure shifts, and that air has to go somewhere. It travels straight through wet epoxy and pops out the surface, leaving little craters. Sherwin-Williams notes these bubbles typically run from pinhead size up to a small few centimeters, and they tend to show up within the first hour or two of cure, right when the slab is warming from foot traffic, sunlight, or ambient heat.
Moisture is the other half of the story. Concrete that hasn't cured long enough, or that sits over an uncontrolled vapor barrier, pushes water vapor up through the slab. Contractors measure this with an ASTM F2170 relative humidity probe test, which reads moisture at 40% of the slab depth rather than guessing from a surface reading.
Not every bubble comes from the slab, though. A fair number come from how the epoxy was mixed and rolled. Mixing at high speed creates a vortex that whips air straight into the resin, and Sherwin-Williams recommends mixing at roughly 100 to 300 rpm with a flat paddle, then letting the batch rest two to five minutes so entrapped air can rise out before you pour. Skip that rest period and you're pouring foam.
Deep pours add a third mechanism. Thick self-leveling sections or river tables generate their own heat as they cure, and that exotherm can vaporize residual solvent or moisture inside the mix, forming bubbles well below the surface.
Reading the bubble pattern tells you a lot before you ever run a moisture test:
- A single round bubble with a visible pinhole usually points to outgassing from the slab.
- A dense field of tiny pinholes across a large area often means air entrained during mixing or rolling.
- Tacky, soft spots near bubble clusters suggest a ratio or mixing error rather than substrate gas.
Some field techs push back on blaming outgassing for every bubble, and they have a point. Real World Epoxies argues that air entrapment from mixing and application shows up far more often than installers assume, so don't skip the mixing checklist just because the slab is old.
How Do You Fix Epoxy Floor Bubbles Right Now?
What you do depends entirely on whether the coating is still wet or has already cured. Fresh bubbles are cheap to fix. Cured bubbles take more work.
If the epoxy is still within its open time:
- Run a spiked or porcupine roller back over the wet coating in a crosshatch pattern to pop surface bubbles as they form.
- If bubbles persist, a brief pass with a heat gun or propane torch held several inches away can help release trapped air. Never linger in one spot, and never use an open flame close enough to scorch the coating.
- Some product lines tolerate a light solvent mist to knock down bubbles, but only follow this step if the manufacturer's technical data sheet specifically allows it.
If the epoxy has already cured with bubbles trapped inside:
- Grind the affected area with 60 to 80 grit on a random orbital sander or small grinder to expose sound material.
- Vacuum every trace of dust. Leftover grit ruins adhesion for the patch.
- Wipe the ground area with a manufacturer-approved solvent such as xylene, per Sherwin-Williams' repair guidance for bubbly or gummy epoxy.
- Fill low spots with a thixotropic patching compound designed to stay put on vertical or textured surfaces.
- Re-prime if the tech data sheet calls for it, then recoat once the patch has cured.
Pro Tip: Mark every bubble location with tape before you start grinding, then repair one small test patch first. If that patch bonds cleanly after 24 hours, move on to the rest of the floor. Coating over a section with a bad bond just buries the same failure under a fresh layer.
How Do You Prevent Bubbles Before You Coat?
Prevention is cheaper than repair, and almost every step here costs less than a day of labor.
Start with a moisture test. An ASTM F2170 in-situ RH probe tells you whether the slab is dry enough to coat or whether you need a vapor mitigation system first. Skipping this step is the single most common reason installers see bubbling and delamination weeks after the job looked fine.
Surface profile matters just as much. Diamond grinding to an ICRI CSP range appropriate for the coating system opens the slab's pores, strips contaminants, and gives the epoxy something to mechanically grip. A primer matched to that profile then seals remaining pores so trapped air has less of a path to the surface.
Mixing and rolling technique round out the list:
- Mix at 100 to 300 rpm with a flat paddle, scraping the bucket sides so nothing sits unmixed.
- Let the batch rest two to five minutes before pouring, giving entrained air time to rise out.
- Use the roller nap specified on the product's technical data sheet, and avoid aggressive back-and-forth rolling that whips new air into the film.
- On self-leveling pours, run a spiked roller immediately after pouring to release air before the surface skins over.
- Coat on falling, not rising, slab temperatures, since a warming slab is exactly when outgassing peaks.
Mixing discipline alone is one of the cheapest, highest-impact controls an installer has against bubble failures, and it costs nothing but a little patience.
When Should You Call a Professional?
Some situations are past the point of a DIY patch. Watch for these red flags:
- Delamination spreading across large sections rather than a handful of spots.
- Bubbles or lifting reappearing in the same area after you've already patched it once.
- RH readings above the coating manufacturer's stated limit.
- A consistent bubble pattern across the entire slab, suggesting a slab-wide moisture or vapor problem rather than an application mistake.
Contractors diagnosing widespread failure typically run three tests: ASTM D7234 pull-off adhesion testing to measure actual bond strength, RH mapping across multiple slab zones, and an ICRI CSP assessment to check whether the original surface profile was ever adequate. Ask any contractor you're considering which of these tests they run, what materials they're proposing for the fix, and what warranty backs the work. If the plan involves regrinding and reprofiling an existing installation, that's often a sign the original prep was skipped entirely.
A Contractor's View on Bubbling and Prep
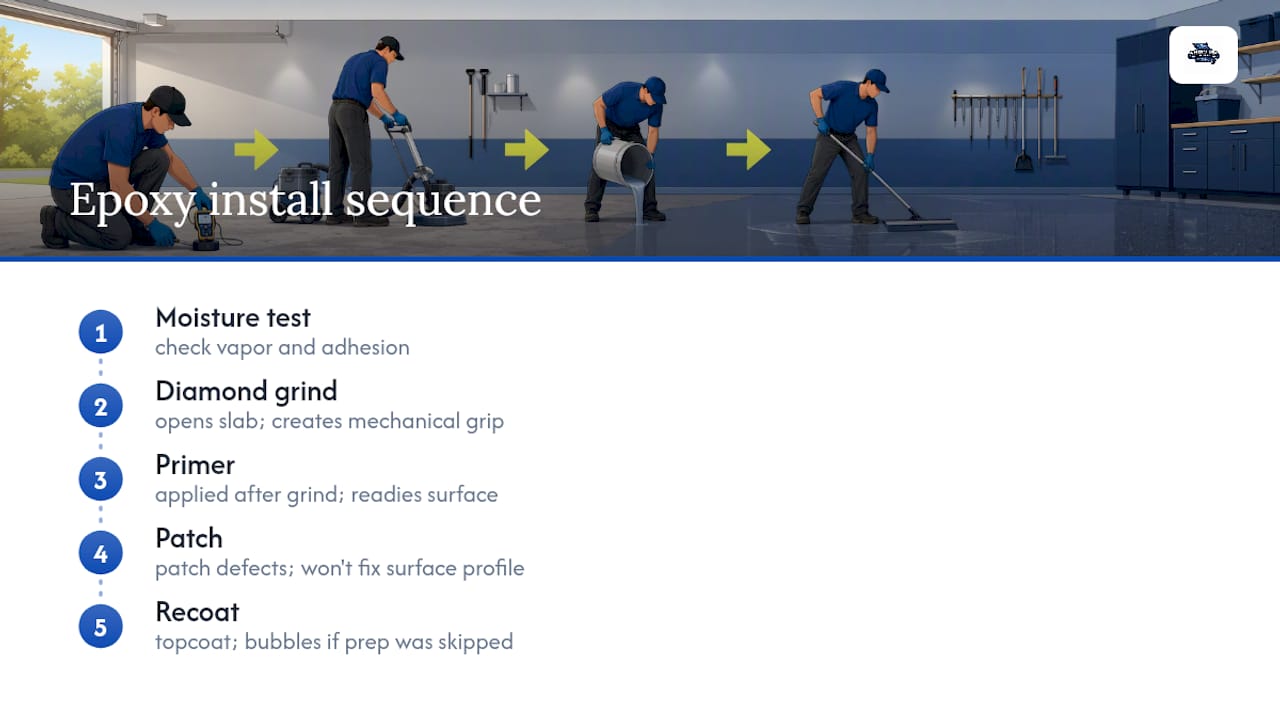
Every epoxy floor Showmeepoxy installs starts the same way: moisture test, then diamond grind, then primer, then patch and recoat. Skipping straight to the topcoat is how homeowners end up calling us a year later about bubbles they thought they'd never see again.
Diamond grinding does two things people underestimate. It opens the slab enough for gas to escape during the primer stage instead of the topcoat stage, and it gives the epoxy a mechanical grip that a light acid etch never will. Most of the "mystery bubbling" we get called out for traces back to a slab that was coated without ever being properly profiled.
Homeowners searching for a quick fix often want to skip straight to patching. Patching without fixing the surface profile underneath it just delays the next failure. If your floor is bubbling across more than a small patch, get a moisture and adhesion assessment before you spend another weekend recoating the same square footage.
For basements especially, where vapor pressure from below is a constant risk, a proper moisture-mitigating basement installation prevents the repeat bubbling that plagues DIY basement jobs. Such diagnostic work and installation are available locally, with straightforward pricing and no pressure to buy more than the floor needs.
What This Guide Gets Right That Others Miss
Most articles on epoxy bubbling treat every case as a mixing mistake, hand you a heat gun tip, and move on. That undersells the problem. The research here points to something sharper: bubbling is almost always a symptom of a slab that was never properly tested or profiled before anyone opened a bucket of epoxy.
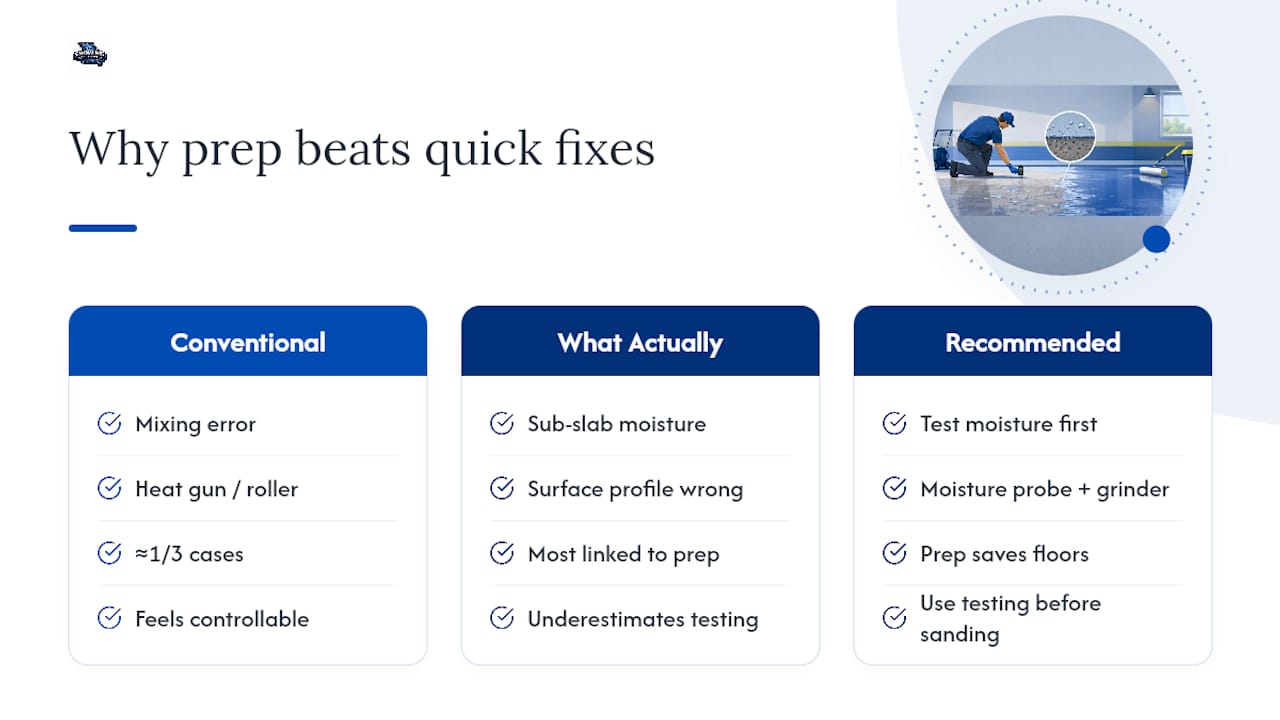
The conventional advice, mix slower and buy a better roller, fixes maybe a third of real-world cases. It ignores the moisture sitting under the slab and the surface profile that never got ground to spec. Homeowners chase the wrong fix because heat guns and rollers feel like something they can control, while a moisture probe or a grinder feels like overkill.
It isn't. If your floor bubbles in more than one or two isolated spots, test the moisture before you touch a sander. Prep, not patching, is where floors actually get saved.
— Stephen